
Removing Bottom Cover
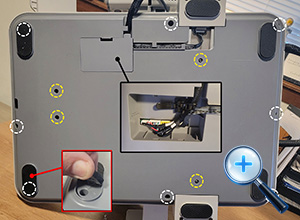
The bottom cover must be removed to access and service the following components:
- Main motherboard
- Y-axis and Z-axis motors
- Y-axis linear rails and belt
- Power supply
- RFID reader (Kobra X only)
Begin by removing the wiring cover and disconnecting the four wiring plugs underneath. The connector leading to the Z-axis motor should also be unplugged from the motor, allowing the short wiring harness to remain with the cover.
The bottom cover is secured with 12 screws:
- 4 machine screws (shown in yellow)
- 8 plastic-threading screws (shown in white)
All screws use a 2 mm Allen driver.
The two outer screws at the front are hidden beneath the rubber feet. Simply lift the outer half of each foot to access the screws.
Tip: Repairing Stripped Plastic Threads
If any of the plastic screw holes becomes stripped, it can often be repaired by applying a small amount of two-part epoxy inside the threaded hole. Use a short piece of filament to spread a thin, even coating, then allow the epoxy to fully cure before reinstalling the screw.
Tip: Protecting Plastic Threads
When reinstalling screws into plastic, first turn the screw counterclockwise (loosening direction) while applying light pressure. You'll often feel the threads "drop" into their original position. Once this happens, turn the screw clockwise to tighten it.
This simple technique helps the screw reuse its original threads instead of cutting new ones, significantly reducing wear on the plastic and extending the life of the threaded holes.